
How to Sample a Gravel Bar
If you are serious about finding gold, then you want to be serious about sampling. I am going to discuss my preferred method of sampling a gravel bar to find pay streaks in this post.
I enjoy sampling, it allows me to explore the river at a leisurely pace, get a bit of exercise, and at the same time, find those pay streaks to come back to with the family. That’s not to say that sampling can't be a family event because it sure can! Just set the kids up operating the Gold Rush Nugget Bucket and they'll have a blast playing with the gravel and water!
To start out, you need only a few tools. You will need a shovel. I use a small one since I am only moving a small amount of gravel. You will also need a Gold Rush Nugget Bucket, as it is light weight and contains two classifiers. It also contains a gold pan and catches material in a fluid/sand trap bowl ready for easy panning.
 Example of what to look for in a river for finding gold.
First of all, we need to read the river. We need to look for places where gold will fall out of the water and rest in the gravels or bedrock. The key is to look for inside bends on the river and back eddies areas of low pressure. Remember we will be searching on a gravel bar that was submerged some time in the past. If there is a big, round boulder high up on the bar, it was likely put there by a flood in the past or possibly by glacier action.
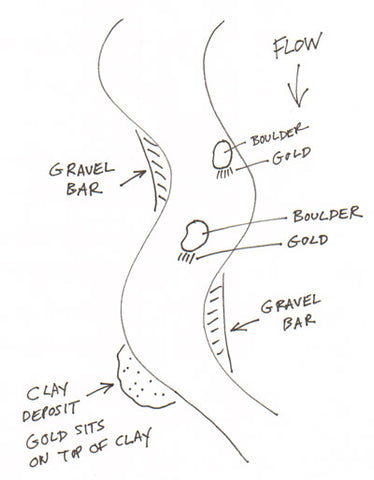
Illustration of what to look for in a river bend when gold panning.
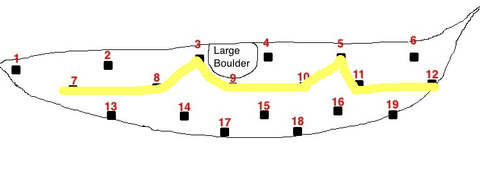
Lets assume we have found a great gravel bar. We want to sample the area every six feet from the water to the bank, and every 12 feet along the length of the bar. Since we are mainly looking for flood gold, we will be digging sample holes six-inches deep and six-inches square. I put the sample in the water pail that comes in the Gold Rush Nugget Bucket, then process each sample in turn by pouring them in the Gold Rush Nugget Bucket, then pan out the results. I record in my pocket book the number of specs, or flakes of gold found in that hole. I also draw a picture of the gravel bar and place numbers of the sample points to use as a reference when mapping the gold occurrences, such as the picture above.
Once the gravel bar has been fully sampled, you will have a nice map of where the pay streak is running and the most productive areas to hit hard on your next visit. With this sampling system, I can usually map several areas in a day without tiring myself out. So remember your shovel and your Gold Rush Nugget Bucket; they are the only the tools you need to successfully sample for gold rich pay streaks!
Comments
11 Comments